Pages

Tuesday, March 29, 2011

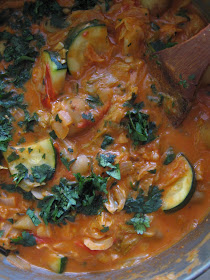
Sending Winter Away With West African Groundnut Stew


Optimism has taken hold!  This is THE week temperatures are sure to rise, and the three feet of snow left in my yard will disappear.  I'm banking on it, cuz I've taken the parka to the dry cleaners, and stuffed the winter boots in a box in the basement.  I'm done with ya Winter,  move along now.  In celebration, I thought I would make one of my all time favourite cold weather comfort bowls:  West African Groundnut Stew. This is perfect student/peasant food - with the bulk of the ingredients being cabbage and potatoes, it's easy on the budget, and lord knows we ate it often enough.


My dear friend Stacy put a special request in for this recipe, as she was a fixture at my kitchen table way long ago in Montreal.  Dinner music then was REM and The Smiths and Duran Duran (I met them once - that's a funny story for another time!)  Conversation was about boys (of course), and home, and 90210 and "who would your rather."   Cheap red wine was purchased at the little store on the corner, and we sat by candlelight til the wee hours.  Now we live at opposite ends of this massive country, but eating this lovely stew tonight makes me think of Stacy, and that makes me happy.


I used fresh hot peppers instead of dried cayenne, but you can use either.  And I added more cilantro, cuz I likey, but I know lots of people don't, so it's up to you.  If you haven't already guessed, the "groundnut" part is peanut butter, which is truly awesome in this stew.  I served mine spooned over some steaming quinoa, for the extra boost of protein, but rice would be fine too.  While you are at it crank up some REM (their new album is fantastic, by the way).


West African Groundnut Stew

2 Tbsp canola oil
1 onion, chopped
1-2 chopped jalapeno peppers, seeds removed, unless you want it super super hot
3 cloves garlic, minced
2 Tbsp grated peeled ginger root
3 cups chopped green cabbage
3 cups cubed potatoes
3 cups tomato juice
1 cup vegetable stock
2 cups chopped tomatoes
2 cups chopped zucchini
1/2 cup chopped cilantro, plus more for garnish
1/2 cup peanut butter (natural is optimal)
salt and pepper to taste

Heat a Dutch oven over medium-high heat. Add the oil. When it has warmed, sauté the onions for about 5 minutes. Stir in jalapeno pepper, garlic and ginger and cook a few more minutes. Add the cabbage and potatoes and cook for 2 minutes. Stir in the tomato juice, veg stock and tomatoes. Cover and simmer 15 minutes until the potatoes are fork tender.  Stir in the zucchini and cilantro and cook 5 minutes longer. Turn the heat to low, stir in the peanut butter and simmer gently until ready to serve.  Add more juice or stock if you find it too thick.  Season with salt and pepper. Add some cayenne pepper for more heat, if need be. Garnish with more cilantro. Serve over bowls of steamed brown rice or quinoa. Serves 6.


Saturday, March 26, 2011

Sweet Saturday: Pétit Pain Au Chocolat


My Life in France  by Julia Child is currently on my bedside table, and I'm savouring every word.  Admittedly this is my first real read of hers, and  I'm blushing as I write this, but I've never made one of her recipes, and I've only seen a few clips of her TV show.  This is shameful, and something I must remedy ASAP.  Of course I read Julie and Julia, and saw the movie too; not sure if I fell in love more with Meryl Streep or Julia Child.    My favourite scene in the movie takes place at one of their dinner parties and Paul is toasting her, saying she's the "butter to his bread, the breath to his life."  So. Lovely.  


Seems like I've been drawn to all things French lately.....A few nights ago I watched Coco Avant Chanel, starring the absolutely gorgeous Audrey Tatou, whom you may recall was in one of my favourite movies, AmelieCoco was wonderful as well - full of fashion and glorious Parisian panorama.  Who knew Chanel was such a social rebel?


I've never been to France.  Heck I've never even been to Europe, which is a travesty in itself.  What sort of self-respecting food lover can write about and live food like I do, and yet has not seen Le Tour Eiffel? A trip is slowly being plotted in the back of my mind:  a hiking tour perhaps; through lavender fields even better.  Stops along the way for dining with the locals, and sipping extraordinary wine.  Then stationing myself in Paris of course.... cafe au lait and croissants on the riverbank; museums and markets; eating until I can eat no more.  "France before Forty" is slowly becoming my mantra.  Who wants to come along?


Being inspired by France and all of its loveliness, I decided to simulate something here, that I know I will love there:  Pain au Chocolat.  This recipe has been hiding out in a binder of mine for years, and I don't know why I haven't made it sooner.  Nothing could be simpler or more lavish on a brunch table; or boxed up with a pretty bow and brought with you to someone else's brunch table.  Easily prepped the night before, and a quick bake in the morning - Voila!  Melted dark chocolate mingles with the buttery layers of puff pastry in a heavenly poem* that is sure to send you pining for France.


Pétit Pain Au Chocolat

2 sheets puff pastry (one 17.3 ounce package), thawed, each sheet cut into 12 squares. Or if you are unable to find the sheet kind, roll out each half until 1/8 inch thick, and cut into squares.  (The sheet size I used was approximately 13"x 17" and I cut 12 squares out of that.  If you can't find that big a size, just roll out what you can, and make the squares accordingly.
1 large egg, beaten, with a bit of water
4 100g. bars bittersweet or milk chocolate.  Each bar cut into six 2x1" pieces, about.  Mine sort of just cracked and I dished it out accordingly. 
Coarse sugar

Line 2 baking sheets with parchment pater.  Brush each puff pastry square with the egg wash.  Place 1 chocolate piece on edge of pastry square.  Roll up dough tightly, enclosing chocolate.  Repeat with remaining chocolate and pastry.  Place seam side down on the bake sheet.   (Can be make one day ahead.  Cover with plastic wrap and refrigerate.)  Preheat oven to 400*F.  Brush tops of pastry rolls with the egg glaze.  Sprinkle with coarse sugar (or regular).  Bake until pastries are golden brown, about 20-22 minutes.  Serve warm or at room temp.   Makes 24 irresistible bundles. 


* Julia Child once described some sole as if it were a  "poem".  Seemed appropriate here as well. 


Wednesday, March 23, 2011

Orange and Cinnamon Scented Rice Pudding With Caramelized Brown Sugar Crust


So officially the calender says that we should be in the season of Spring.  Well, in my neck of the woods, it is STILL winter.  A blizzard rages outside my window;  I have enough snow in my backyard to build a massive snow fort if I wanted ( I don't!), and there is no sign of melting until maybe next week.  The only bright side to this never-ending winter (besides making snow angels!) is that I can make some wonderful comfort food I haven't had a chance to yet.  Things like butterscotch pudding, and chocolate caramel bread pudding and you guessed it, rice pudding!  I'm all about pudding lately.  Not sure why.  Yes, I have all of my teeth, and no I'm not 100 years old.  There's just something really homey and comforting about it.  March is a tough month for me.  It's so long and dreary, and world events are kind of bumming me out.  I guess I just need more comfort all around.  Or like my friend Mindy tells me on a fairly regular basis "girl, we need to find you a man!"  I just hope he likes pudding.


This is nothing like your Granny's rice pudding - there is no cornstarch or eggs or glueyness to it that can sometimes give rice pudding a bad wrap.  Using arborio rice creates a luscious pudding, scented with maple and hits of orange and cinnamon. I love the cinnamon sticks nestled in the rice while it bakes - your house will smell incredible.  And the brown sugar crust.  Well holy smokes! It's a beautiful thing.


I've never baked with almond milk and I was very impressed.  The pudding is rich tasting, but not heavy.  You could use all 2% if you like, but don't use skim.  The brown sugar crust sort of melts and you are left with this delicious caramelized brown sugar syrup.  Spooned into my pretty blue dishes, and sprinkled with freshly grated nutmeg and orange zest, the rice pudding soothes this winter weary soul. The blizzard can rage on for all I care.  I have  pudding to see me through.


Orange and Cinnamon Scented Rice Pudding With Caramelized Brown Sugar Crust

4 cups 10% cream (use whatever liquid you want.  almond milk; 2%; or a combo of whatever you like)
1 cup arborio rice (do not subsitute any other rice)
1/2 cup granulated sugar
1/4 cup maple syrup
1 tbsp finely grated orange rind
2 tsp pure vanilla extract
1 tsp nutmeg
2 cinnamon sticks (if you don't have, 1 tsp of ground cinnamon is fine)
1/2 cup packed brown sugar

In a large bowl, stir together liquid, rice, sugar, syrup, orange zest, vanilla, and spices.  Scrape into a buttered 10 cup baking dish.  Nestle the cinammon sticks in rice.  Cover tightly with alluminium foil and bake at 325*F for one hour.  Stir, cover again, and bake for 15 minutes longer.  Remove from oven, and take out cinnamon sticks.  Sprinkle the brown sugar over the rice and put under broiler for about 4 minutes, until bubbly. Keep a close eye so as not to burn.  That would  be awful!   Best served warm or at room temperature.  Refrigerate for up to 3 days.  Makes about 6-8 servings. 


Sunday, March 20, 2011

Breakfast for a Blogger: Buttermilk Flax Pancakes with Maple Syrup Apples and Toasted Pecans


I've mentioned before that I love breakfast.  I really do.  I love making it, I love going out for it, and is there anything better than breakfast in bed?   Even during the week, I must sit and have my Kashi Organic Cinnamon Harvest Squares, with almond milk.  If I ever have to leave the house because I'm running late, and chose the 10 minutes of lie in time instead of breakfast, then my day is totally off.  Lucky for me I work in a kitchen so there is always fruit or muffins.  But still, I like the little time at home to eat my cereal and catch a glimpse of the paper, or listen to good music on CBC Radio 2.  Weekend mornings I'm more ambitious.  If I'm not meeting friends for Eggs Benedict at my favourite diner, then I'll rustle up something at home.   With buttermilk always in the fridge, pancakes are a sure bet.  I'll whip up a big batch and freeze some - for mornings when I want breakfast practically already done for me. 


These pancakes are all fancified with maple syrup apples and toasted pecans, and the batter is super light and fluffy, thanks to the buttermilk.  Given a chance I'll put maple syrup in almost anything! 
While I lived in Quebec for a few years, I never took the opportunity to visit a "sugaring off".  Silly me.  That would have been a great experience.  It's definitely on my list of culinary adventures I must partake in, along with making gnocchi in Italy and eating a croissant (or two!) in Paris.


Buttermilk Flax Pancakes with Maple Syrup Apples and Toasted Pecans

Maple Syrup Apples
2 tbsp butter
3 large Golden Delicious apples, peeled, cored, and cut into 1/2 inch slices
1 tbsp plus 1/2 cup maple syrup
1/2 tsp cinnamon

Pancakes
1 cup all purpose flour
2 tbsp ground flax
1 tbsp packed brown sugar
1 tsp baking powder
1 tsp baking soda
1/2 tsp salt
1 cup buttermilk

1 large egg
1/2 tbsp vegetable oil
1/2 cup toasted pecan pieces


For the apples, heat the butter in a skillet until melting, add the apples and 1 tbsp maple syrup; cook until tender, about 5 minutes.  Add the rest of the maple syrup and cinnamon.  Set aside.

For the pancakes, combine the first six ingredients, whisk to blend.  In a medium bowl, whisk the buttermilk, and egg.  Add to the dry and stir just until blended, but still lumpy.  Gently mix in the oil.  Heat a griddle over medium high heat, and lightly grease with oil or butter.  Drop batter by ice cream scoop.  You can make them as big or as little as you like.  Cook until bubbles appear on the top, about 3 minutes.  Flip and cook until firm. Transfer to plates and spoon over the apples and sprinkle toasted pecans.  Add more butter and maple syrup, if you like.  Serves 4. 


Saturday, March 19, 2011

In Gratitude


I'm a lucky girl.
I count little blessings everyday.  There is so much to be grateful for, some days I can't stand it. 
So as horrific events in Japan unfold,  like everyone else, I'm left here wondering what I can do.  Besides send aid and positive thoughts, not much.  Listening to news reports of more explosions and the possibility of plutonium being released into the atmosphere only freaks me out more.  And then I wonder, should I even be writing about food at this time?  Does it really matter how awesome my big salad is, and does anyone care if I wax poetic about these perfect red velvet cupcakes?  Is it acceptable to be writing about food when there are terrible, terrible tragedies unfolding in Japan?


Whenever there have been tragedies (the big, and the little) in my life, there has always been food.  People gather in kitchens to talk lovingly about those who passed.  They bring casseroles to your door when you are too heartbroken to cook.  Once upon a time I had sweet sweet friends throw me a surprise dinner party, simply to cheer me up, and it was a night I'll never forget.  Food is comfort, and in dark days, even more so.  I tend to be a bit of worry wort by nature and I find I feel a million times better if I spend time in the kitchen, baking little muffins, or in the big bad situations, baking bread or something that takes more effort.  In the end it's not even about eating, it's about the distraction.  For that small time I've forgotten what it is that's troubling me.  Sometimes it takes a tragedy to make you appreciate what you have. I hug loved ones a little tighter.  I tell my mom I love her.  I write a letter to a friend I haven't seen in so long I almost forget what her face looks like.  I put the tea kettle on, brew up my favourite Japanese Sencha (Kyoto Cherry Rose), and send positive thoughts to those far far away. 


Wednesday, March 16, 2011

Red Velvet Cupcakes with Dark Chocolate Ganache and Raspberry Cream Cheese Icing


I had a date on the weekend.  Don't get too excited - it wasn't THAT kind of date; although Mindy-the-matchmaker is working on it (always!) No, I had a PLAY date with my big-girl nieces. (My little-girl nieces are just 1 and 2 years old, and not ready for sleepovers, but that will be super fun when it happens!) Sydney and Taylor, the awesome big girls that they are, came over on Saturday for one of our requisite hanging out sessions.  I don't have kids, so spending time with the nieces and nephews (I have 7 in total!) is my adventure into Kidland.  I find out about what they want to be when they grow up, and about their boyfriends (!!) and about how cool decimals are (oh grade 4 math!)  Being an aunt is a role I cherish...I love being the confidante, and the one who lets them stay up late and drink too much chocolate milk.  We watch the movies I watched when I was a kid, and I'll even sit and watch something Disney-ish too.  I let them pick out a vintage tea cup and saucer from my cabinet, and we have tea parties....they the chocolate milk, and Auntie Renee has, ahem, something a wee bit stronger in hers.  I make a sweet treat, and we sit back, cuddled on the couch, with our blankets and pillows and Sunny the cat curling up wherever he can.  Nights like this I'm hoping they will remember always. 


Red Velvet Cake has been intriguing me lately, and I know, everywhere you look there are recipes galore.  I really wanted to try it, and I LOVE that there are beets in this recipe (don't be scared!  You can't taste them!)  I found a pretty good recipe in  "Chatelaine" magazine, but I added melted butter instead of oil, because I wanted a richer flavour.  The dipping in ganache was something I thought would be amazing (and it is!), while the raspberry cream cheese icing is just the perfect touch to an already incredible chocolate cupcake.  Raspberry and chocolate is one of my favourite flavour combos in the whole world - they were simply born to be together!  The cake really isn't that red.  I have an aversion to food colouring, but if you wanted a redder looking cake, then by all means add a few drops. 


Oh. The kids adored these cupcakes.  As did their Auntie!


Red Velvet Cupcakes with Dark Chocolate Ganache and Raspberry Cream Cheese Icing

1/4 cup frozen raspberries
2 1/2 cups all purpose flour
1/2 cup unsweetened cocoa powder
1 1/2 tsp baking powder
1/2 tsp baking soda
1 tsp salt
1 398ml can beets, rinsed, drained, patted dry
1 1/2 cups granulated sugar
1/2 cup melted butter (OR vegetable oil)
2 eggs
2 tsp vanilla
1 cup buttermilk
1/2 block light cream cheese (OR full fat), cubed
1/2 cup icing sugar

Leave the raspberries on the counter to thaw.
Preheat oven to 350*F
Line a 12 cup muffin tin with papers, or spray with oil.  Stir together dry ingredients.  Puree beets in a blender, or with the immersion blender.  Beat the sugar and oil in a medium sized bowl, using an electric mixer, for about 2 minutes.  Beat in the eggs, then the beets, and vanilla.  Gradually beat in one-third of the flour mixture, just until blended, then half of the buttermilk. Scrape down the bowl, repeat additions, ending with the flour mixture.  Divide the batter among the muffin cups, filling 3/4 full.  I had batter left, as this recipe  makes about 18 cupcakes.  Bake in the centre of your oven for about 25 minutes, or until tester comes out clean.  Cool in pan on rack for 15 minutes, then remove from pan and cool completely before dipping in ganache.


Chocolate Ganache

3/4 cup heavy cream
6 ounces dark chocolate, chopped

Place chopped chocolate in a bowl.  Heat the cream in a saucepan until boiling.  Pour over the chopped chocolate, and whisk until smooth.  Let sit for about 10 minutes before you dip your cupcakes.  Plunge the tops in (I had taken the muffin papers off for a prettier look), and let rest on a cutting board or rack.  Let sit for a few minutes and plunge again.  Or just do a single dip, and that will still be amazing!  Wait until the glaze is completely set, before piping on your raspberry cream cheese icing. 


Raspberry Cream Cheese Icing

Strain your raspberries, reserving the liquid.  In a mixing bowl, beat the cream cheese until soft, add the icing sugar and the raspberry  juice.  Blend until super smooth.  I had to add a bit more icing sugar until I got a thicker consistency.  You can pipe a dollop on top of your chocolate ganache cupcake, or you can completely omit the ganache dunking and simply smooth the cupcake with this icing.  The choice is yours!  These are best eaten the day of, but will be fine if refrigerated in an air tight container, for a couple of days.  And no one will know there are beets in their chocolate cake!


Saturday, March 12, 2011

For Your Sunday Brunch: Buttermilk Scones With Saskatoon Berry Butter


Sunday morning is my favourite time of the week.  I have enough jam packed activity going on Monday - Saturday, but Sundays are mine to savour.   I sleep in a little, stay in the pajamas longer, and get caught up on any episodes of "Coronation Street" I may have missed throughout the week.  Did I just admit that I watch that long running British soap?  Guess I did.  I don't watch lots of TV, but "Corrie" and "TMZ" are really the only shows I tape.  Nope, I'm not a "Law and Order" kind of girl.  Bring on the celebrity smut and crazy Brit characters I love so much!  Sunday morning means I also like to bust out a pretty decent breakfast, be it waffles or pancakes or sometimes just hearty oatmeal with maple syrup and toasted pecans.  I brew up some English Breakfast in my polka dot tea pot, sit back and watch a little telly, or perch on a stool and read the paper in the sunlight streaming into my little green kitchen. Afterwards I'll maybe go for a hike, or take in a movie, or meet up with friends for coffee.  My mom has me over for Sunday dinner so I don't even have to cook if I don't want to!  Yes, I savour my Sundays.


When I worked in Edmonton at Rutherford House, I  made these scones almost every day the four and a half years I was there.  That's a lot of scones!  Scone making was how I started my work day, and there was something about the gentle kneading and rolling and cutting out shapes that eased me into my busy day.  The scones are light and fluffy and go perfectly with this Saskatoon Berry butter.  What is a Saskatoon Berry you say?  Well, it's native to the Western Canadian Prairies, not to be confused with the blueberry.  Saskatoons are deep deep purple and have a musky, almond-like sweetness.  They grow along river banks and coulees and I spent many a childhood summer day picking them (and eating them!). My mom and sister make fantastic jam and syrup, but they didn't make any last year so I'm out of my stash of that royal goodness.  Good thing I found the sweetest old couple at the farmer's market that makes really really good jam, almost as good as my mom's.  The berry butter is so easy and amazing, you'll wonder why you haven't  made it before.  Slathered on a warm scone, it's a little bit of heaven.


Buttermilk Scones

6 cups flour
1 tsp baking soda
3 tbsp baking powder
dash salt
2/3 cup sugar
1 cup butter, cut into cubes
6 eggs
1 3/4 cup buttermilk
1/4 cup heavy cream
1 tsp vanilla

Preheat oven to 350*F
In a large bowl, combine all the dry ingredients.  Cut in the cold butter with a pastry blender.  In another bowl, beat the eggs, add the buttermilk and cream, vanilla.  Add the wet to the dry and stir just to combine.  Form into a ball, and knead a few times.  Roll out to 1/2 " thickness.  Cut out round shapes with a cookie cutter or glass.  Arrange on bake sheet, sprinkle some coarse sugar if you like.  Bake at 350*F for 25-30 minutes until golden brown.  Makes about 24 scones.  These freeze very well.


For the Berry Butter
1/2 cup softened butter, salted or unsalted, your choice
1/2 cup saskatoon berry jam, or any other jam you like.  Raspberry, blueberry, strawberry, the choice is yours!
In a mixer, or by hand, whip the softened butter and jam together, until very fluffy.  That's all you do!  Keeps well in the fridge, but given its deliciousness, it won't be there long.
Both recipes adapted from The Arbour Restaurant in Rutherford House. 


Thursday, March 10, 2011

Eat Your Greens! Swiss Chard and Feta Phyllo Pizza


The first cook book I ever bought was "The Enchanted Broccoli Forest" by Mollie Katzen.  I was 20 and about to leave home for the first time, embarking on my cross Canada trek to art school.  What I loved  about this book then, as I do now, are the whimsical drawings that accompany every recipe.  The fine details Molly designed on every cauliflower and walnut and asparagus spear are I'm sure what attracted me to this book in the first place.  Her rendering of basil leaves is immaculate!  I grew up in a house where  meat was served at almost every meal, and being the cash strapped student, I knew that would not be the case in my new digs.  Needless to say this book came in very handy!  I made mayo for the first time, and pesto and hummus, and amazing enchiladas.  Me and my roommates would flip through and plan dinner parties around the recipes.  Though I do recall one night when someone made a casserole of apples and sauerkraut that did not go over very well.  Um, no.  This book has travelled with me to and fro and I still like to go back to it once in awhile.  I have this thing about books, (and even more so, recipes) that when I see them and re-read them  I'm transported a little back in time.  What I wouldn't give to cook for my old roommate again, and have one of our epic dinner parties; surrounded by candle-lit friendly faces and red wine. And lots and lots of laughter. 


This pizza is my favourite thing in the whole entire book.  It does call for spinach, but since I developed an allergy to spinach about ten years ago ( I think I was eating too much of it and my body revolted!), I used Swiss Chard, and it turned out perfectly delicious.  I did cut back a little on the butter, but not the cheese. I gotta have cheese! The phyllo crust is crispy and buttery, and holds up well to the earthiness of the chard.  Feta and mozzarella and pesto bring it all together and the tomatoes (please use the on-the-vine kind) round it out  perfectly.  A lovely vegetarian meal indeed.


Mollie Katzen's Greek Pizza

1/2 lb phyllo pastry (about half the box)
1/4 cup melted butter
1/4 olive oil

2 tbsp olive oil
1 cup chopped onion
1/4 tsp salt
3 cloves garlic, smashed
1/2 tsp crushed basil and oregano, each
juice from one lemon
1 lb fresh spinach or Swiss chard, cleaned and stemmed and chopped. OR 1 10oz package of frozen spinach.
1/4 cup pesto (optional)
lots of fresh ground pepper
smattering of coarse salt
1 lb grated mozzarella
1 1/2 cups crumbled feta
2 medium tomatoes
1/2 cup fine bread crumbs


In a small bowl, combine the olive oil and melted butter.  Set aside. 

In a large skillet, cook the onions and garlic with the salt in 2 tbsp olive oil, until onions are clear  and soft.  Add herbs and lemon juice, stir well.  Add the greens and cook on fairly high heat until they cook down and all the liquid is evaporated.  Stir in the pesto, if using. 

On a large buttered bake sheet, brush one sheet with melted butter and olive oil mixture.  Repeat with the rest of the phyllo.  Brush the top of the stack with the oil/butter mixture.  Use a slotted spoon to transfer the greens mixture to the phyllo.  Spread evenly, leaving a 1/2 inch border of pastry.  Sprinkle on the feta and half the mozzarella.  Dredge the tomatoes in the bread crumbs, and arrange these on top of the pizza.  Toss the remaining mozza over the tomatoes.   Bake uncovered for 25-30 minutes. 


I'm curious.  What was the first cook book you ever bought for yourself?


1994 Revisited!

Monday, March 7, 2011

Conjuring Spring With Slow Cooked BBQ Ribs


Winter is still roaring where I live on the Canadian Prairies.  It's been almost a solid five months of bone chilling cold.  And there is no respite in the near future.  Having spent most winters of my life out here I know the deal, but it still doesn't mean I have to like it!  I've been a good sport long enough.  It's time to think of shedding layers and wearing the cute boots instead of the practical, warm, fleece lined pair.  I want pretty tops instead of wool sweaters.  I want to get in my car and drive, instead of having to let it warm up for minutes beforehand.  And I want to grill my food!  But the BBQ is buried somewhere out in the snow pile that is covering my patio.  Not one to give up on a dream, especially a dream of food, I thought I would whip up a beautiful BBQ sauce, throw it over some ribs and slow cook the whole deal in my crock pot.  If I closed my eyes and inhaled, surely I would recall what it is to be basking in sunshine, sipping a nice chilled Pinot Grigio on the patio while the ribs were sizzling away on the BBQ.   


Whenever something turns out incredible in the slow cooker, I kind of scold myself for not using it more often.  These ribs were fantastic!  Truly the fall off the bone variety. The sauce was spicy and sweet, and the ground ginger wrapped it all up nicely.  I used one rack of ribs, cut into 3 rib sections, and that is what this recipe calls for.  It can be easily doubled though.  When the time comes for proper BBQ-ing (it will, right?) I would brush this sauce over everything.  Ribs, chicken, chops.  Just cook the sauce on the stove top first for about 20 minutes.

Slow Cooked BBQ Pork Ribs

1 side of pork ribs, cut into 3 rib sections.
1/2 onion, chopped
3 cloves garlic, minced
1 cup ketchup
1 cup crushed tomatoes
1/4 cup cider vinegar
1/4 cup honey
1 tbsp molasses
1 tbsp hot sauce
1 tsp chili powder OR 1/2 tsp ground chipotle pepper
1 tsp ground ginger
2 tsp coarse salt

Preheat oven to 350*F
Season your ribs with salt and pepper.  Cook in the oven for 40 minutes, turning a few times.  (This will cook off some of the grease.)
In the meantime, in a medium bowl, add the onions, garlic and rest of the sauce ingredients and stir well. When the ribs have cooked, place them in the slow cooker. Pour the sauce over top and stir to evenly coat.  Refrigerate over night if you are getting this ready the night before.  If not, then set the timer for 8 hours on LOW.  I roasted some baby potatoes in olive oil and garlic with a little coarse salt and pepper.  Coleslaw would have been awesome, but I had these delightful baby greens, so a garden salad it was. (Serves 3-4)


With a little taste of this sauce, I know I can hang in there.  Spring REALLY is just around the corner. Until then, I'll try conjuring it with pretty flowers too.  It can't hurt!


Saturday, March 5, 2011

Sweet Saturday: Dark Chocolate Pastries with Dried Fruit and Nuts


I was rummaging around in my little green kitchen's pantry (really just an IKEA piece with a butcher block counter and two big cupboards) to see what sort of hidden gems are lingering.  I'm guilty of buying groceries and sort of tossing them in, not really placing them nicely.  I know.  I can be lazy.  But the good thing is once in awhile when I'm looking for something specific I'll find something accidental, and that's when the magic happens.  So I was looking specifically for cans of crushed tomatoes, and I accidentally found this block of gorgeous Green &Black's dark chocolate.  I adore Green & Black's. It's organic and fair trade, and you can get it at London Drugs.  (Try the bars with candied ginger and orange spice bits too.)  But back to this bar of dark.   I never did find the tomatoes, but there was also a small package of dried cranberries and I always have some almonds somewhere, and I thought hmmmmm.  What shall this be?  Looked in the fridge and there was still some phyllo pastry left from my Oscar Appetizers.  I could have just been boring and eaten the chocolate like that, but I wanted a little drama with my chocolate, so I thought, why not wrap this whole concoction in phyllo and see what happens?  


Glory be!  The layers were buttery and the chocolate oozy and warm, perfect with the tang of the cranberries and the crunch of the nuts.  Next time I would use more nuts, and I think I'll specifically buy dried cherries just for this.  Dried cran are ok, but dried cherries are on a whole other level of deliciousness.  I might switch up the nuts too - pecans would be perfect. With toffee chips! The whole deal took about 35 minutes start to finish.  Seriously.  This is some quick pastry makin'.

Dark Chocolate Pastries with Dried Fruit and Nuts

4 sheets of phyllo pastry
6 Tbsp of melted butter
1/2 cup dark chocolate (good quality), chopped
1/2 cup nuts, chopped, slightly toasted (almonds or pecans, or walnuts.  your choice)
1/4 cup (or a bit more) dried cranberries, or cherries.   

Preheat oven to 350*F
Line a bake sheet with parchment. 
In a bowl, combine the chopped chocolate, nuts and fruit. 
Lay one sheet of phyllo out on counter.  Keep remaining sheets covered with a damp cloth. 
Brush butter over the phyllo.  Repeat with remaining 3 sheets.
Sprinkle the chocolate mixture lengthwise down the phyllo, leaving a one inch border on the 3 sides.  Roll, starting from the edge closest to you, tucking in the sides.  Roll tightly.  Place on the bake sheet and brush with more butter.  Bake for 15-17 minutes until golden brown. When completely cooled, slice on the diagonal.  Makes about 18 pastries.  Best served, (and eaten!) the day of, but that shouldn't be a problem.


Tuesday, March 1, 2011

The Magnificent Macaroni and Cheese: A Story of Friendship and Bacon


Get ready bacon lovers.  This is for you.  Especially for my dear friend Chelsey who put in a special request for this recipe.  And I can't say no to Chelse.  She was amongst the first people to say "Renee, you should start a food blog!", after I posted a picture of smoked salmon corn cakes on my Facebook page last summer.  Other friends soon took up the chorus, and the proverbial light bulb went off over my head.  Ah ha!

 The thing is, Chelse is one of my oldest friends in the whole world, knowing  me from the time of vile haircuts and bad skin to glasses that should never, ever have been worn.  We met in Grade 8 Science Class.  I sat in front of her, and probably asked to borrow a pencil or something.  With a matching quirky  sense of humour, we somehow managed to escape relatively unharmed (at least physically) from the hell that was junior high.  Bonding at sleepovers with "Slang Teasers" and Ouija  Boards, watching Ferris and eating DQ ice cream cake, those days were golden.  Our friend Mel came into the picture in grade 10, and those two ladies made me laugh in class probably more than I should have.  Twenty years ago this June we graduated from the same high school in the same small town.  When we were 18, we'd drive down the four-laner blaring Madonna and the B'52s, eyes wide, wondering just what was in store for our little lives.


 We moved on.  Chelse and I moved to Saskatoon, and  a couple of years later I moved to Montreal.   Over the years there have been marriages, babies, busy careers, and long distances.  But the thing about old friendships is that they take a little work to maintain.  You have to fight a little bit for it.  Everyone is busy; with work and family; with life.  Send little messages here and there. Call once in awhile.  Let them know you haven't forgotten them.  Being spread across this massive country of ours, visits are infrequent, but fabulous.  Mel and I text almost everyday, and Chelse leaves really kind, encouraging comments on FB.  It's the little things that keep you in touch.  And when you have a history as full and rich as ours, you never ever want to lose that closeness. 


Now the Mac and Cheese Bit.  Chelse loves her bacon almost as much as I do.  When she heard I put bacon in my Mac, she was intrigued.  Cooking the onions and garlic in the bacon fat is a little piece of heaven I'm happy to give you.  You don't have to use as much bacon, or any at all (!!!!!) but if you are going to the land of  mac and cheese, you might as well go all out.  I don't eat or make this everyday.  It's a treat. So make it like a treat.  Use good, aged cheddar, preferably white, or switch it up with some Swiss or Gouda or Provolone or  Fontina.  Whole wheat pasta adds some fibre (and you know how I feel about fibre!), and if you wanted to feel a little less guilty, add some broccoli or cauliflower before you put it in the oven. But feeling guilty gets you nowhere.  So indulge in this Magnificence.  Call some old friends and give them this recipe too. 


The Magnificent Mac and Cheese

3 Cups of elbow macaroni
2 tsp. vegetable oil or butter
10 slices of bacon, chopped (if not using bacon, use 1/4 cup butter)
1/2 cup diced onion
2 cloves of garlic, minced
1/4 cup plus a bit more all purpose flour
2 cups of milk
1/2 cup of 35% cream or half and half or milk (depending on your fat preference!)
1.5 tbsp Dijon mustard
1/2 tsp hot sauce
salt and pepper to taste
1 1/2 cups of  grated aged white cheddar, or a combination of your favourite cheeses
1 cup bread crumbs tossed with 2-3 tbsp melted butter
1/2 cup shredded Parmesan cheese

Preheat oven to 350*F
Grease a 9"x13" pan.
Boil the pasta until al dente. Drain and toss in either the oil melted butter. Set aside.
In a large pot, cook the chopped bacon until crisp.  Scoop out all but 1/4 cup of bacon fat.  (If not using bacon, melt 1/4 cup butter.) Saute the onions until translucent.  Add the garlic and cook a little longer.  Inhale frequently!  Gradually stir in the flour and cook for a minute or two, stirring constantly.  Gradually whisk in your milk and cream, until nice and thick.  Stir in your  mustard and seasonings.  Stir stir stir.  Add the cheese and see if it needs salt and pepper. If sauce is too thick, add a bit more milk.  Stir in your crispy bacon and cooked macaroni (if you were being healthy you could add your veggies now, and a bit more milk.) Pour this glorious concoction into your pan.  In a small bowl, combine your breadcrumbs and Parmesan, and sprinkle this over your mac.  Bake in the oven until golden and bubbly, about 25-30 minutes.  Makes about 6-8 servings.  Are you in heaven now or what?